Why you should store your research data on a YoDa drive
YoDa is a research data management service that enables you and your research partners to securely deposit, share, publish and preserve large amounts of research data during all stages of a research project.
YoDa is a safe and reliable service. It allows you to store data in a simple filing structure similar to that on the W:-drive or MS-OneDrive, while it also allows for more detailed metadata and sharing management. YoDa also offers the possibility to restore data and archive data in a vault.
All data stored on a YoDa drive is still accessible after your WUR account expires, unlike the M-drive and MS-Onedrive.
YoDa is compliant to the FAIR (Findable, Accessible, Interoperable and Reusable) standard. According to the G20 in 2016, all research data storage should meet the FAIR principle.
It is recommended to backup your research data to your YoDa drive on a daily base or whenever it changes.
Accessing YoDa
Please notice, that the YoDa-drive address is different from the YoDa-Portal (website) address, respectively https://data.yoda.wur.nl and https://yoda.wur.nl.
As a first step, contact M. Lubbers to create a YoDa drive for your research data.
When you are a WUR employee, fill in your WUR email address to login and use your WUR password to log in. There is a one-time accepting to send the required information for accessing Yoda.
If you’re not a WUR employee you'll receive an activation email once a YoDa drive has been created for you.
Note that you need for transferring data a data access password generated within the Yoda webportal. Go to the webportal, sign in, click on your name in the right top corner, and choose ‘Data Access Password’. Generate a password, copy it, and use that one when adding yoda as a network drive (or when you are accessing it through iCommands). The Data Access Password remains valid for 90 days. After 90 days you will need to generate a new password.
Transferring data to Yoda
For data transfer with optimal transfer rate and without limitations on file- and folder size, use the software packages mentioned below.
The transfer rate is limited by speed of your internet connection. To gain the highest speed use a LAN (if possible) instead of a WIFI connection.
On both Windows and MacOS many programs able to transfer data to a YoDa drive were tested.
On Windows, Cyberduck turned out to be the fastest, followed by WinSCP. On WUR clients both programs are available for installation. If you don't use a WUR client, you can download the software for free.
On MacOS, it's recommended to use Forklift. Although the software is not for free, it works without hitches and offers many additional features.
Remark: Use the YoDa drive address for the installation of the above mentioned programs and the generated data password.
How to map (connect) to a YoDa drive in Windows Explorer
Even though, it is possible to use Windows Explorer to transfer data to your YoDa drive, due to the Microsoft's implementation of the WedDav protocol the transfer speed is low and file- and folder sizes ar limited. So, only use it if you don't have the software packages mentioned above.
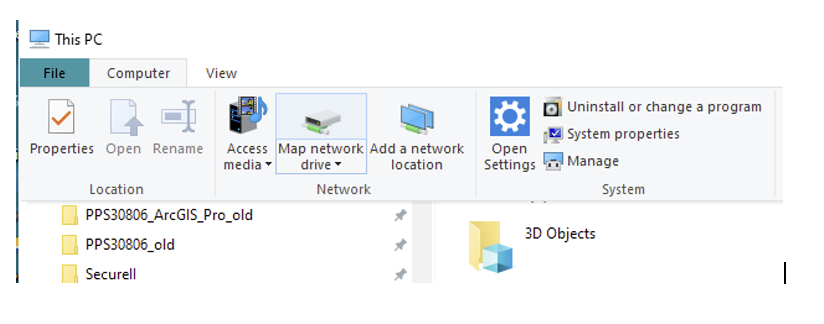
After starting Windows explorer, the first step is to click on “Computer” and “Map network drive” (see screen shot below).
As a next step, select a “Drive” letter, enter as a folder name “https://data.yoda.wur.nl”, check the options “Reconnect at sign-in” and “Connect using different credentials” and press the “Finish” button. The “Drive” letter can be chosen freely, as long it's not already in use.
Finally, enter your login credentials, being your email address and the generated data password. Check “Remember my credentials” and press the OK button. After a few seconds, the drive should be visible in Windows Explorer.